Revolutionary Tennis |
||
Tennis Instruction That Makes Sense |
||
Grand Unification Theory: the tennis stance
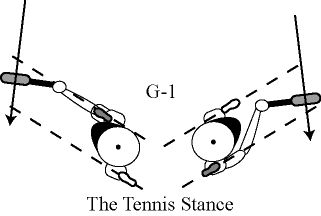
The Tennis Stance "Just Right" Angular Perspective Grand Unification Theory Extreme Shots Drills, Clinics, Camps There exists the concept of perfect tennis form, and this happens when you hit the ball "just right." That is for the most part prior to contact you moved forward into the ball just right, Step 1, at contact your feet were just right to one another and to the ball's flight line, Step 2, you were neither sideways nor open to the ball at contact and linear momentum from the body empowered the swing, not angular momentum, Step 4. (And you hit the ball on time.) Doing things just right, then, finds you in the Tennis Stance, a fixed relationship of the feet and body and weight shift into the ball at contact. The configuration of the arm at contact is discussed in the Step pertaining to the stroke and not here, and body weight shift is found in Step 4. The big picture here belongs to the feet, the body, and their relationship to the angle of the ball that moves away from you. By understanding the Tennis Stance you will be able to strengthen your weakest stroke. You'll be able to understand why something isn't working right and you'll be able to do something about it beyond what's been discussed in other Steps. Revolutionary Tennis breaks new ground here. THE TENNIS STANCE
If this looks familiar to you it's because the feet are in the Forward Stance, Step 3, and this forms the foundation to the Tennis Stance. The Tennis Stance is the Forward Stance linked on a particular angle to the angle of the ball: you're not stretching, you're not too close, you're "just right."
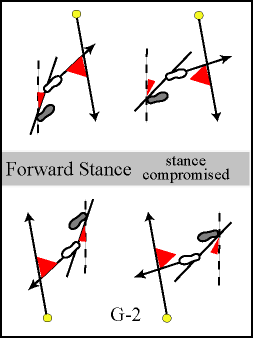
In the Forward Stance, G-2 left top, both feet have been moving into the ball's angle per Step 1. Here the feet are not spread that far apart from each other when viewed from above. However, if you step across, shown in G-2 right, top and bottom, the feet no longer are moving into the ball's angle. Here the feet spread apart too much and the Forward Stance is compromised.
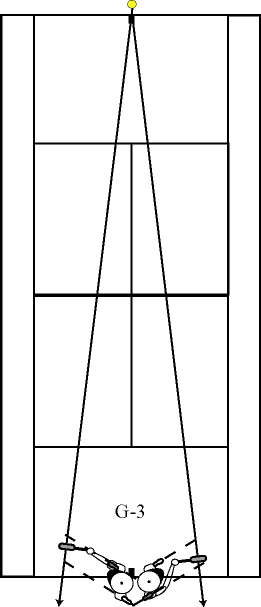
When the angle of the ball changes, the Tennis Stance remains the same with respect to the ball but your perspective with the court changes. This change is responsible for being able to hit "just right" under any circumstance: returning deep balls into your corner, down the line, hitting inside out, returning serve, volleys. Let me show you how this works. G-3 is a full court view of G-1 to hit "just right." The court is drawn to scale, but the player is not so you can see things better. I should have placed the little player closer to the center for contact, but I wouldn't have been able to fit both backhand and forehand in one diagram. In G-3 the angle of the ball represents a "simple" rally that is familiar to you. It's an easy ball that started from the middle of the opponent's court, the court lies straight ahead of you, you move forward into the ball, and contact is made when it's neither too close nor too far away. Just right. But of course not every rally is of the easy, normal kind. More often than not you're dealing with a ball hit crosscourt against you or down your sideline. How, then, do you change your perspective on the court in order to maintain the Tennis Stance?
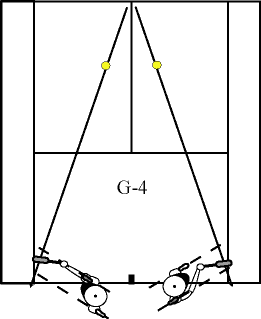
ANGULAR PERSPECTIVE Diagram G-4 is different than G-3. Here the ball is struck from the opponent's corner, not from the middle, and it then goes crosscourt to your own corner, not close to your own middle. But while the angle of the incoming ball in G-4 is different than in G-3, the player remains the same with respect to the court as in G-3. G-4 does not replicate the Tennis Stance (G-1 and G-3) because relative to the ball's flight line the feet and body are turned too much to the side (and the racket face is not at a right angle to the ball's flight line). The difference is slight and not easy to see, but I'll soon overlap the two. Yes it's true you could make contact earlier to be at a right angle to the flight line, and that would help a lot, but the point is here your body is not optimally aligned with the ball (the Tennis Stance) as it was when hitting "just right" in the "simple" rally in the earlier examples.
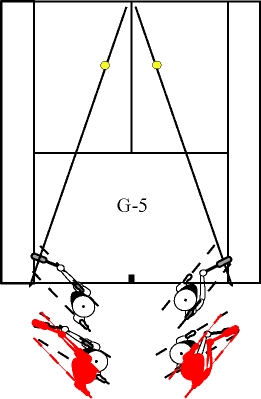
Below G-5 I superimposed the readjusted Tennis Stance (in red) over the G-4 stance that is too turned to one side (in black).
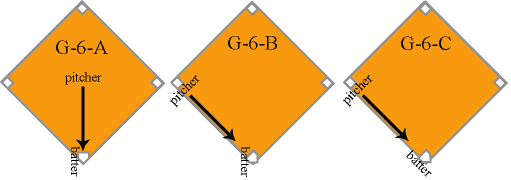
BATTER UP Baseball offers a clarifying perspective. Say you're at home plate, diagram G-6-A, in the batter's stance, sideways, one foot ahead of the other, and the pitcher is straight away to the left side of your body. The batting stance is the player's alignment to hit a baseball thrown over home plate. But what if the pitcher decided to move to third base before pitching to you, what would you do? Would you remain in your stance, G-6-B, and be too turned to the side to handle the ball well, or would you readjust your stance to maintain your alignment with the ball thrown at you, G-6-C? The answer is you'd readjust.
Yes, some baseball players open or close their stance, but it's safe to say the batting stance reflects a particular angle of the feet and body with respect to flight path of the incoming ball.
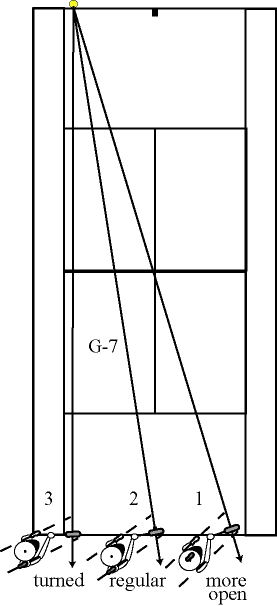
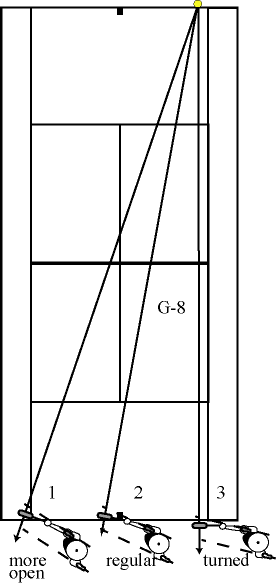
GRAND UNIFICATION THEORY Diagrams G-7 and G-8 unlock the hidden richness to your game. They show how to change your perspective on the court to maintain the Tennis Stance as the angle of the ball changes.
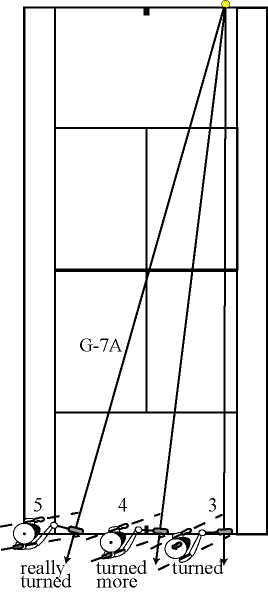
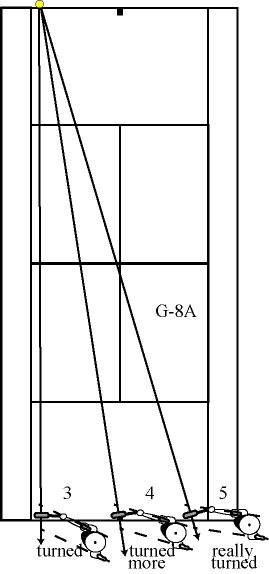
Let's get our bearing straight here first. The descriptions "more open, regular, turned, turned more, really turned" are depictions of your perspective with regard to the court. Depending on where the ball is coming from, to execute the Tennis Stance you run the gamut of being really turned with regard to the court, position number 5, to being more open to it, number 1. G-7 and G-8 help explain how to position yourself to return balls hit crosscourt into your backhand corner, how to position yourself when running around your backhand to hit inside out, how to position yourself when returning serve for singles or doubles. Even though all positions are aligned equally with the ball and are "just right," you are most comfortable with position number 2, "regular," because you are neither turned too much nor too little with regard to the court ahead of you. You have to get used to being more turned and less turned.
G-7 and G-8 act as troubleshooting diagrams. As an example, how do you achieve the Tennis Stance for a ball hit crosscourt against you to your backhand corner? G-8, position number 1, shows the position of the Tennis Stance with regard to the court. It is the "more open" position. Unfortunately, the tennis establishment often advises you "turn" or "turn more" to deal with the ball crosscourt into your backhand corner, positions number 3 in G-8, or number 4 in G-8A. This is like our baseball batter in the G-6-B example not adjusting when the pitcher moved over to third base to pitch. Your alignment is so out of whack the only chance you've got to get a good shot off is a lucky one. Time and time again students diligently "turn" when a ball goes crosscourt to their backhand, and time and time again the resulting shot is weak. "You are over-turned," I say to the student. "Open up with respect to the net and you'll be aligned properly with the ball." I love watching the smile that follows their solid crosscourt return to my own backhand. HOW TO GET THERE FROM HERE How do you wind up in the Tennis Stance if the angle of the ball is different every single time? Footwork. Better yet, your footwork changes with regard to the court, just like the Tennis Stance. It's perspective again.
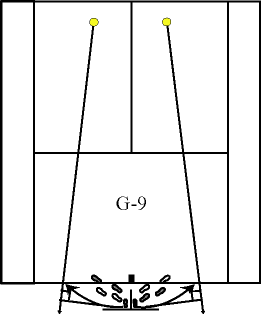
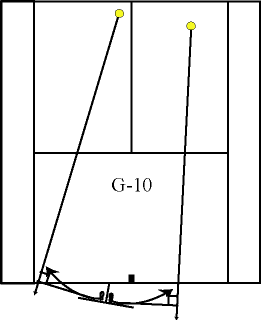
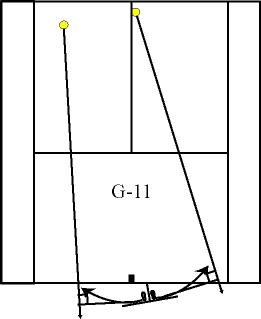
From Step 2 you know that to remain in the middle of that angle of possibilities you need to reposition yourself either to the right or left of the center hashmark. It is extremely rare the ball is hit at you literally from the middle of your opponent's baseline. To see how the perspective of your footwork moving forward into the ball changes with regard to the court, move the opponent's contact spot from G-9 over to the corner. You're left with diagrams G-10 and G-11.
Movement. You no longer are facing the rectangular court head on, so instead of moving forward into the court in equal measures either to the left or right it's going to be lopsided. Responding to the ball hit crosscourt against you, you need to move more inward toward the baseline (and at times inside it) to ensure moving forward into the ball. Moving towards the baseline here is difficult to do when the ball is perfectly deep, yes, but it's possible when your ready position begins five feet behind the baseline (the pros do). A deeper ready position than the one in shown in G-10 and G-11 (two and a half feet) pulls that right angle mark farther back and behind the baseline, giving you more room with which to move into the ball. Maybe now it's clearer how hitting deep into the opposite corner makes it more difficult for your opponent to move forward into the ball.
Responding to the ball hit down the far sideline against you, moving forward into the ball means moving behind the baseline or even parallel to it. Too often players equate moving into the ball with getting inside the baseline, but that's not the case here unless the ball is really short. Since this shot by your opponent can get by you faster (it travels less distance), the upside is you're giving yourself more time to deal with it by moving behind the baseline rather than inside it. This angular perspective defines how to move into the ball on volleys and returns of serve, and will be outlined in their respective Step.
THE EXTREME SHOTS So far the angle involved in the diagrams has been a reasonable one, not an extreme one you may encounter on occasion. An extreme angle means the ball goes crosscourt more sharply, or hugs the sideline more (2 feet from the sideline in the following diagrams). If you try to take 4 steps on groundstrokes with these extreme shots you wind up turning sideways to the ball instead of moving into the ball. And then you think, "if only I could have started over closer to the ball maybe I could moved into it instead of turning over sideways." You're right, you translate your ready position over a little to that one side before executing your 4 step footwork pattern. Here's how.
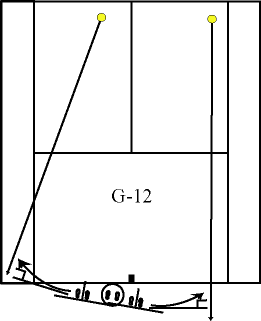
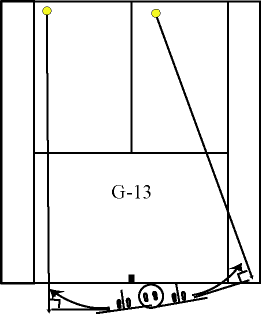
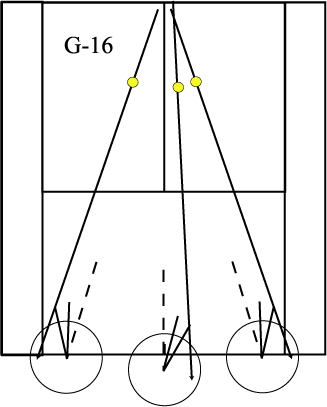
To translate your ready position over to the one side you take a quick 2 step sidestep. Diagrams G-12 and G-13 show this effect. The circle with the feet represents your initial ready position, and the second ready position with the feet represents what's happened after taking the 2 step sidestep to one side or the other. Once accomplished, you can move into the ball with your 4 step footwork pattern or at the least avoid turning sideways. Of course, you know this takes extra effort. This is the only time sidestepping as part of your movement toward the ball is required, to get your ready position over a bit with regard to the ball so you can arc into it. This is an exception to Revolutionary Tennis' 4-step general movement pattern due to the extreme situation, though it's still an even number of steps. Remember, the tennis establishment wants you to sidestep, sidestep, step forward (to the net or the target) and hit as your general movement pattern. This casserole of a footwork pattern not only in part tries to promote the exception as the rule, but as shown in Step 2 this pattern is arrhythmic, covers ground inefficiently, promotes imbalance, promotes an open stance, and sends you and your momentum off to the side instead of into the ball. You have also heard and read that your front foot on your backhand should step toward the net post on that same side. This advice works only when the ball is coming at one particular angle, but since tennis reality finds the ball constantly flying across the court at a different angle, the front foot is always stepping differently on the court. The front foot is always stepping at and into the ever-changing-angled ball. Thus a reference point on the court can not serve for any aspect of the game since they are fixed, like a dance floor, while the ball, and you, constantly dance together. DRILLS, CLINICS, CAMPS The most popular drill at camps and clinics is where the feeder stands up at the net and feeds a series of balls to a student at the baseline who runs across the court. Sadly, this kind of arrangement where the student runs parallel to the baseline does not reinforce the idea that there is a relationship between the student's angle of approach into the ball with regard to the ball's flight angle with the student. The result is you're not practicing the Tennis Stance, you're not strengthening the muscle memory at the foundational level responsible for success.
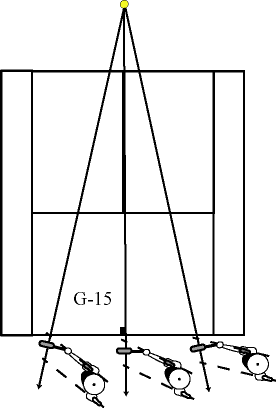
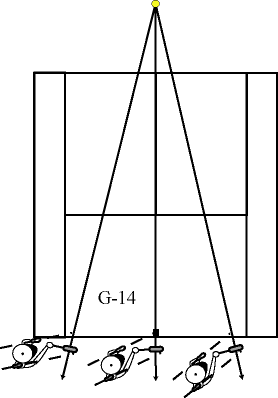
Diagrams G-14 and G-15 illustrate how your stance needs to adjust per the ball's angle when a player feeds you the ball from the middle of the court up at the net (or from anywhere for that matter). As you can see, it's definitely not a case of blindly running parallel to the baseline, or of turning and stepping in the same fashion for all three balls. If you can not avoid this drill altogether, the solution is to start a good five feet behind the line and be really turned for the first ball, move inward inside the baseline for the second one, and then continue arcing inward for the third ball. Of course the feeder has to cooperate, each ball being successfully shorter. If the feeder hits the last ball deep into your corner, you're being asked to hit on the run, which is okay to run your behind off. But if you want to learn how to handle that tough ball in a real rally, you'll need to assume the body and feet angle from the "more open" position of diagrams 7 and 8 above, which is basically impossible to do in this drill unless the feeder waits for you to square up and sidestep past the center mark before feeding the ball and then asking you to move into it appropriately. "IT'S THE BALL, STUPID," by unknown tennis bum You reposition with, you move forward into, you angle into with, you shift your weight into, you swing head-on into, THE BALL.
The Grand Unification Theory adds more elegance to an already elegant game. Play within this elegance and your tennis friends will be envious. |
||
|
|
||||||||||||||||||||||||||||||||||||||||||||||||||||||||||||||
 I
I