Rhythm 4 Steps Old Footwork Sidestepping Recovery Step Gravity Step Repositioning Help the Backhand
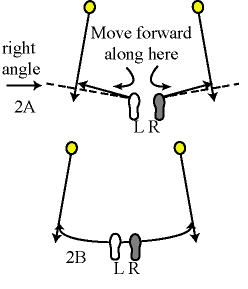 Footwork. Step 1 shows that moving into a ball angling away from you means moving forward on an angle less than 90 degrees to the ball's flight line (2A). You don't move literally on a straight line as indicated in diagram 2A, but the idea is not to move beyond the 90 degree mark. Basically, the movement pattern is an arc (2B). Footwork. Step 1 shows that moving into a ball angling away from you means moving forward on an angle less than 90 degrees to the ball's flight line (2A). You don't move literally on a straight line as indicated in diagram 2A, but the idea is not to move beyond the 90 degree mark. Basically, the movement pattern is an arc (2B).
How should the feet move, which one first? There are different ways and directions in which to move the feet, but two things come to mind. First, you start by standing still at point A, the ready position, and will move forward to the contact spot at point B without compulsory steps, restrictions, or avoiding obstacles on the court.
Second, human beings are bipedal. That means human locomotion, our gait, works in two's, in pairs.
Child development literature explains the progression of motor skills involved when learning how to kick a soccer ball. First, a child stands still and swings 1 foot to kick the ball. Some time later, the child takes 1 step and kicks. This skill is considered fully developed when the child takes 2 steps and kicks the ball. This 2-step method prior to execution forms the basis of natural human rhythm method prior to execution forms the basis of natural human rhythm.

RHYTHM
If you're familiar with other sports that involve movement, such as basketball, soccer, or when fielding a baseball, you know you take a minimum of 2 steps before shooting, kicking, or throwing the ball. No matter how many steps are taken in the approach, the feet do a final 1-2 before executing the act: 1-2 throw, 1-2 shoot, 1-2 kick. An exception is shooting foul shots in basketball, where you stand still.
Your 2 feet complement each other in everything you do, whether you're standing still and one foot moves to shift your weight (the other follows), or walking. When running the feet work in pairs: 1-2, 1-2, 1-2. That is steps 1 and 2 are taken, then 3-4, 5-6, and so on.
Tennis is a game of movement. Bipedal rhythm indicates there should be 2 steps prior to execution, which means you take step number 1, step number 2, and then hit the ball, not pivot, step and hit.
2 STEPS PRIOR TO CONTACT, 1-2 AND HIT
When one foot pivots, and the other one steps before the hit, that's only 1 step prior to contact and not 2. The same if one foot drags, or slides while the other steps. This is like taking 1 step before kicking a soccer ball, it's both arrhythmic and underdeveloped.
TO STEP OR NOT TO STEP INTO THE BALL
THAT IS THE QUESTION
The debate is whether there's more power when you hit with an open stance, or when you step into the ball with the front foot. As a teacher and player I feel there is more power when stepping into the ball with the front foot, that is with the left foot on the right side, and the right foot on the left side, than by choosing an open stance. Into the ball is key here. This is detailed further in Steps 3 and 4, and is not to be confused with the "standard method," a flawed representation of footwork structure.
All right. What do we know? We need to move forward, both feet step before contact, 1-2, and we want to step into the ball with the front foot. What we don't know is which foot will move first on which side. Luckily, our 2-step pattern of human locomotion can answer this.
When hitting a ball on your right side, your left foot will be the front foot that steps into the ball prior to contact. As such, your left foot is the 2, or the second step, of a 1-2 pattern that occurs prior to contact. This means your right foot is the 1, or the first step. Together they complement each other and form a 1-2 (and hit). On this right side, your right foot is called the back foot, the left your front foot.
It is the mirror image when hitting a ball on your left side. Here the right foot will be the front foot that steps into the ball prior to contact, making the left foot the 1, or the first step, on that side.
In everyday life you move your right foot first when moving to the right, your left first when moving to the left, and your feet work in pairs. It's natural. Why not do this in your tennis?

MOVEMENT SHOULD BE SYMMETRICALLY EQUIVALENT FROM FOREHAND TO BACKHAND
BACK FOOT FIRST / FRONT FOOT LAST
AND ALWAYS, ALWAYS, INTO THE BALL
Beginning from the ready position, then, the right foot moves first when moving to the right, the left when moving to the left. And in what direction? Forward (2A, 2B), not to the side or backward, not in-place by pivoting (1E). If you want to go backwards and hit the ball, then by all means step back with your first step. But if you want to move into the ball, then your first step must be in the same direction.
All right. This is what we know. Move forward, back foot first, a 1-2 before hitting. However, you can't hit groundstrokes well by taking only 2 steps. Either you'll stretch to reach the ball, or your rhythm will be off because while you're ready to hit, the ball won't be there yet. Rhythm is 1-2 and hit, not 1-2 and wait, and wait, and hit.
4 STEPS 4 STEPS 4 STEPS 4 STEPS
I've found that 4 steps reaches most groundstroke situations. More steps and you're hitting on-the-run.
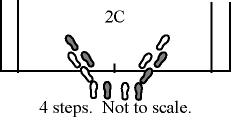 When moving to the right, it's right foot first, followed by the left, then right, then left, and contact. When moving to the left, it's left foot first, then right, left, right, and contact. In other words you take 2 sets of a 1-2 movement pattern, 1-2, 3-4. 4 steps (2C). Contact follows the even numbered step, the front foot. When moving to the right, it's right foot first, followed by the left, then right, then left, and contact. When moving to the left, it's left foot first, then right, left, right, and contact. In other words you take 2 sets of a 1-2 movement pattern, 1-2, 3-4. 4 steps (2C). Contact follows the even numbered step, the front foot.
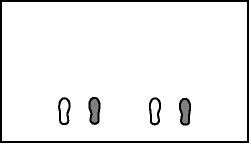 Click on the footwork image on the right to see the back foot move first and forward into the ball, to your left or to your right, and to see 4 steps.. Click to stop it as well. This is not to scale, simply representative of the movement, both forward and complementary. Click on the footwork image on the right to see the back foot move first and forward into the ball, to your left or to your right, and to see 4 steps.. Click to stop it as well. This is not to scale, simply representative of the movement, both forward and complementary.
You start with large steps, not small ones, because you need to get moving. Step #1 out of the ready position is the most important because it gets you headed INTO the ball from the get-go. Without it chances are good you won't reach the ball on time.
Tennis literature talks about footwork as small, adjusting steps, but you can't build a footwork model based on adjustment steps. Perhaps the confusion lies in the fact that it is the last 2 steps (of this 4 step model) that adjust their stride as needed, and the last one is completely on its own depending on the efficiency of your movement angle into the ball. You need to MOVE, and INTO the ball, and it has to be done efficiently. More follows.
Bear with me, I know you're thinking, "4 steps, way too many." Let me explain.
You don't take 4 steps like you're casually walking across the room, just 4 steps within the amount of distance you have between your ready position and the contact spot. Sometimes they'll be 4 small, quick steps; sometimes the last step will be a stutter step, sometimes it will be a long step. Furthermore, one foot moves past the other and you don't sidestep, as if you were limping.

OLD FOOTWORK
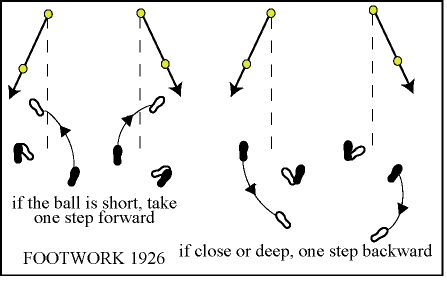
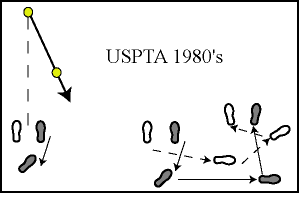 For your amusement, I'm juxtaposing modern day footwork as prescribed by the United States Professional Tennis Association in their book, USPTA Professional Guide, Official Handbook, which teachers have to study to earn certification, and a convoluted footwork pattern from 1926, The Mechanics of the Game, by J. Parmly Paret, as part of the Lawn Tennis Library of instructional books. Though the placement of the feet in the ready position has changed in 60 years, the idea of moving backwards first lives on. For your amusement, I'm juxtaposing modern day footwork as prescribed by the United States Professional Tennis Association in their book, USPTA Professional Guide, Official Handbook, which teachers have to study to earn certification, and a convoluted footwork pattern from 1926, The Mechanics of the Game, by J. Parmly Paret, as part of the Lawn Tennis Library of instructional books. Though the placement of the feet in the ready position has changed in 60 years, the idea of moving backwards first lives on.

Sidestepping
Sidestepping while moving forward is an inefficient movement pattern because one foot fails to cover distance while the other one does. The front foot takes an actual step, but the back foot doesn't, it drags behind the front foot without taking a step past it (2D). Your aim is to move forward with as little effort as possible, which means the feet move past one another in the same pattern as if you were 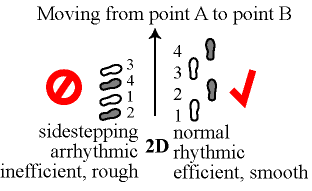 walking. walking.
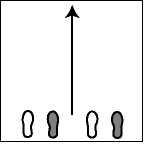
Click on the footwork image below left with the arrow to see how sidestepping compares to moving normally.

RECOVERY STEP
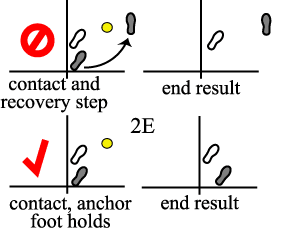
Adding a recovery step to your footwork during your contact makes it harder to get ready, costs you time, reduces your body's support, and inconsistent results follow. Diagram 2E shows the extra distance involved to get ready after the hit when taking a recovery step during contact instead of holding the anchor foot down as best as possible. It doesn't matter if you backpedal or turn and run back to get ready. This extra distance costs you time, of which there's never enough, and the ensuing lack of support from body rotation that naturally accompanies the recovery step is responsible for mishits, as outlined in Step 3 and 4.
A recovery step helps change directions and recovers balance, it is not a part of a footwork model designed to end in contact. Your feet need to maintain their position when you swing to increase the swing's speed, to support your contact spot, to produce more power, and to eliminate upper/lower body movement during contact, the culprit behind stroke inconsistency.
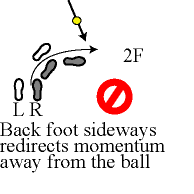 What happens when you do move correctly into the ball but place your anchor foot sideways prior to contact? Not only are you short-changing your court coverage when your penultimate step works inefficiently (2D above), but your momentum gets re-directed away from the ball, 2F. What happens when you do move correctly into the ball but place your anchor foot sideways prior to contact? Not only are you short-changing your court coverage when your penultimate step works inefficiently (2D above), but your momentum gets re-directed away from the ball, 2F.
For returns and volleys you only take the minimum of 2 steps because there's both less distance between you and your opponent's contact, and the ball's never as wide away from you as it could be in the backcourt (1A).

WHAT ABOUT THE GRAVITY STEP?
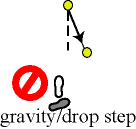 The gravity step, or drop step, finds the back foot moving first, followed by the front foot. In this sense it adheres to the idea that the foot nearest the ball, the back foot, moves first. The gravity step, or drop step, finds the back foot moving first, followed by the front foot. In this sense it adheres to the idea that the foot nearest the ball, the back foot, moves first.
Roll the mouse over the image to see the step in action.
But the gravity step finds the back foot moving in the direction opposite the ball's. The back foot moves backwards, beneath the body toward the other foot, leaving the body imbalanced, almost falling over. It is argued that you move faster by imbalancing the body and having to catch up with it, so to speak.
As I mentioned earlier, there are many ways we move our feet to get from point A to point B. Our experiences have a lot to do with the way we move. I feel the gravity step has developed as a result of turning sideways first, as a result of turning the shoulders, hips, or feet first instead of simply moving (hopefully forward) to the ball.
When the body turns in place your body weight is placed on the foot closest to the ball, that is the back foot. At this point it is impossible to move that foot toward the ball. The result is either the other foot crosses over for the first step, or the back foot drops back under the body, creating imbalance to jump start the body.
Pros have been taught to turn first, then move. The gravity step developed as a compensatory technique to both turn and move, much like the open stance compensates for the fact that stepping sideways doesn't allow the body to empower the stroke (Step 3). But you'll avoid having to compensate if you first move forward to the ball because you turn automatically by moving (Step 4 ). Less is more.
BUT BEFORE YOU TAKE THAT 1ST STEP..... SPLIT-STEP
Before you take that first step you have to hop in-place, sometimes called a split step. You lift both feet off the ground, you unweight the body, and when you touch down you move more quickly to the ball because your body is in motion to begin with. Your response is much slower if you stand dead still, notice where the ball's going, and then begin to move.
When you split step at the baseline or up close to the net try not to land with your feet too far apart or you won't be able to push off well to get going into the ball. A wide stance means you're holding ground, a narrow one means you're moving. Try to keep the feet closer rather than farther away, a difficult task but one well worth trying.
With a split step you're likely to land and start leaning over to move into the ball, your torso wants to get going before your feet. Moving too aggressively promotes imbalance, which lessens the body's ability to act as a strong foundation for your stroke, Step 5. Your first step won't get you to the ball, it simply gets you going. More importantly, your first step establishes whatever vertical balance you will have throughout the routine, Step 5. Be balanced first, and then make up the distance to the ball with the next step(s).
PLAYING AGAINST BALLS HIT DEEP INTO THE CORNERS
Stand back 5 feet from the baseline in order to keep the ball in front of you/defend against the hard shots into the corner or deep to the baseline. If you take 4 steps on balls really deep and hard into the corners, your body will be too turned to the side to effectively deliver its momentum into the ball (instead, it goes into the side fence). There is a limit on taking 4 steps into the ball while keeping the body structured well to support the contact, but this limit can be overcome fairly easily.
That limit is roughly halfway to your singles sideline corner, and it can be overcome by translating the ready position farther over to the corner before breaking into the 4 step pattern into the ball. You do this by side-stepping, or shuffling to the side for one two-step pattern, then taking 4 steps. This is the only time a shuffle is needed, it's an exception. Conventional tennis wants you to shuffle all the time and then take but one step, which is arrhythmic, causes you to lose your balance, promotes an open stance, and sends you and your momentum off to the side instead of into the ball.

REPOSITIONING
Repositioning, the bane of all tennis players. It's easy to go and hit the ball, but you can't stay where you are on the court because you'll be strategically out of position. You need to reposition. That means for groundstrokes you need to get back behind the baseline in order to face the center of your opponent's angle of shot-making possibilities.
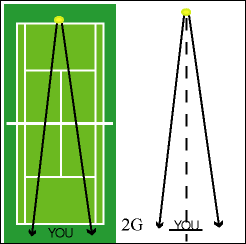 Mathematically, you can always draw a straight line between you and your opponent's contact spot. This line forms a zero degree baseline, away from which the ball angles either to your right or left, no matter how slight or your position on the court, 2G right. It's as if your ready position is at the 6 o'clock spot on a clock face, the opponent's contact spot is at 12, and the ball goes either to 5 or 7 o'clock. It's rare the ball comes directly at you, more often you move incorrectly and the ball goes right into your body. Mathematically, you can always draw a straight line between you and your opponent's contact spot. This line forms a zero degree baseline, away from which the ball angles either to your right or left, no matter how slight or your position on the court, 2G right. It's as if your ready position is at the 6 o'clock spot on a clock face, the opponent's contact spot is at 12, and the ball goes either to 5 or 7 o'clock. It's rare the ball comes directly at you, more often you move incorrectly and the ball goes right into your body.
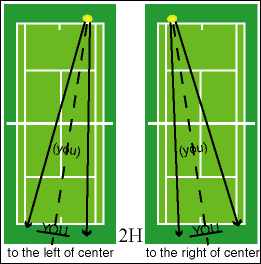 In singles you reposition three to five feet behind the baseline AND slightly to the right or left of the center hashmark, not dead-center (2H). Your opponent's contact spot isn't literally in the middle of his/her court as in diagram 1A, it's always off to one side. If you remain dead-center behind your baseline you won't be facing the center of the angle of possibilities against you, you'll be off too much to one side. In singles you reposition three to five feet behind the baseline AND slightly to the right or left of the center hashmark, not dead-center (2H). Your opponent's contact spot isn't literally in the middle of his/her court as in diagram 1A, it's always off to one side. If you remain dead-center behind your baseline you won't be facing the center of the angle of possibilities against you, you'll be off too much to one side.
Diagram 2H shows this repositioning effect. You are on the side opposite your opponent's contact spot. In doubles you simply reposition behind the singles sideline corner behind the baseline.
When you're up at the net for singles you're on the same side as your opponent's contact spot. I know it's a bit confusing, but it's part of the same family. In diagram 2H I have simply drawn a line from the ready position in the back court to the opponent's contact spot (the zero degree baseline). If you walk from the back court along this line up to the net, you cross over the middle of the court and wind up on the same side as your opponent's contact spot. For doubles you remain in the middle of your service box and reposition laterally either toward your alley if the ball is hit into your opponent's alley on your same side, or toward the middle if it's hit into the alley on the side opposite you.

THE FIRST STEP TO EMPOWERING YOUR BACKHAND
IS TO IMPROVE THE USE OF YOUR NON-DOMINANT LEG
One reason why your forehand is stronger than your backhand is because the foot that moves first, the back foot, happens to be your dominant foot/leg. You easily move this foot first, and if not, at least it manages to keep the contact spot ahead of you, in the direction of the net, and not off in the direction of the side fence. On backhands, though, your non-dominant foot/leg fails on both accounts, and it drags behind as the dominant foot tries to take over.
In everyday life there is no problem moving to your right or to your left, your feet move easily and unencumbered. You don't make the distinction, "this is my backhand side, it's weaker, I should go around and approach it from my forehand side." The first step to empowering your backhand is to move your back foot first and forward and train it to keep you moving into the ball. It's awkward at first, but you will get to the ball faster, your momentum will be directed into the ball, and when combined with other elements to come, you will be establishing a strong foundation with the body from which to empower your stroke. I used a ball machine to train my non-dominant leg/foot. I held my left foot in the air and moved it forward when the ball appeared. And I took 4 steps, making sure my left foot moved forward on that third step.
Why is hitting open stance popular with the pros? Conventional tennis teaches the front foot to step first by doing a crossover step. Here the back foot pivots against the ground (1E) and the front foot takes a step as step #1. The back foot becomes step #2 and contact is made in an open stance.
An open stance is rhythmically sound when the first step is a crossover step (step #2 leaves you on the back foot). Furthermore, pros starting with a crossover step avoid stepping into the ball with the front foot because one more step throws the 1-2 and hit rhythm off into 1-2, 3, and hit. And they've experienced that stepping sideways with the front foot doesn't empower the stroke, as explained in Step 3.

ADDENDUM
Anyone watching Roger Federer has undoubtedly noticed he sidesteps once, or twice, then steps to the ball with the front foot (or remains in an open stance), yet he also moves in the more conventional 1-2 manner as described in this Step. He is not alone in this. Is this sidestepping footwork pattern something to emulate?
I wrote earlier in the "Sidestepping" portion above: "Conventional tennis wants you to shuffle all the time and then take but one step, which is arrhythmic, causes you to lose your balance, promotes an open stance, and sends you and your momentum off to the side instead of into the ball." I still believe this, especially when teaching how to play. And evidence for me remains clear in both student and pro of the extra challenges created by a sidestepping movement pattern.
So why does Federer do it? The sidestep pattern is used when, ironically, the ball is coming fast. Why? Keeping the ball ahead or in front of you increases the chances of hitting on time because it opens the hitting window (visually, physically). Using the 1-2 pattern to move fast to a fast ball can turn the body away from the ball, which also turns your head and momentum to the side, whereas using the 1-2 pattern to move fast to a ball that is not so fast doesn't turn the body so dramatically.
The sidestepping pattern on a forehand keeps you, or Federer, in an open stance, from which you choose either to remain that way and hit open with the weight on the back foot or step the front foot in-place (Open Forward Stance), or choose to take a more forward step with the front foot forward into the ball (Forward Stance). A one-handed backhand leaves little choice but to step with the front foot (open stance is done better using the 1-2 movement pattern), whereas a two hander has the same choices as with a forehand.
Lots of pros use the sidestep pattern, but when we do it something's amiss because it doesn't work like with Federer. Why? The first drawback of this sidestep pattern is you don't cover distance as you would using in a normal, 1-2 pattern, and pros attempt to overcome by being top athletes. And though the sidestep pattern seems simpler there are other prices to pay besides getting into shape like a pro athlete to help make up for this inefficient movement pattern.
With the sidestep movement pattern you to have to prepare the swing not only sooner but the adjustments at the end are made more demanding; you have to fight harder to keep your balance before and during the swing since your momentum's sideward direction is at odds with the stroke's more forward direction into the ball; and with only one step before the hit the whole thing is arrhythmic. This is all very difficult to do, it is far too easy to lose the prep work, the balance, the momentum redirection, or the overall rhythm using one step, let alone getting close enough to the ball to begin with so you don't have to adjust/make up for distance. This explains why, even when the pros do it, they don't execute like Federer. He alone remains well balanced and stabilized during his shot, two cornerstones to his success his peers try to emulate but can't.
Federer's overall composure on the court is the reason he's number one, that is his talent in many areas (moves well, balances and counter balances, stabilizes, vision, etc.). You can certainly sidestep and hit the ball like he does but remember how challenging it really is because it taxes so many other areas. And if your game is a bit off stop the sidestepping and work in a 1-2 movement pattern instead to re-ground your rhythm and get the feet moving again a little better.

- move foot A first if ball is short
- move foot B if ball is deep
- move opposite foot first if ball is far
- move closest foot first if ball is close
- small steps, then large ones
- stutter steps, side steps, crab steps, or drag one foot behind you
|
- right foot first to the right, short or deep ball
- left foot first to the left, short or deep ball
- get going with large steps
- 4 steps groundies, 2 on volleys
|
 
|